I hope such a day never befalls any of you, but you may find yourself without a coffee maker and in dire need of coffee.
So you’ll be thinking: how to make coffee without a coffee maker?
Not to worry, though – there are a few really awesome hacks to make a decent cup of coffee even if you don’t have a coffee maker handy.
Though I think the more likely situation is that the power is out, or your machine is not working, or UPS has not delivered your coffee maker yet 😉
So in this post, I thought I’d go ahead and share some of my favorite ways to make coffee without a coffee maker.
How to make coffee without a coffee maker: the basics
The secret to good great coffee is actually making sure all the parts come together perfectly:
Using good quality beans
You can be a master barista but you can’t extract flavor out of bad beans. Make sure the beans you’re using are as freshly roasted as possible, and roasted to the consistency you like best(light/medium/dark) and you’ll be able to make great coffee.
Grind just before brewing
Grind size is really, really important. Grind size dictates how well the coffee mixes with the water, so if you don’t grind properly, you may end up over-or-under extracting the coffee flavors and oils, and you’ll end up with a flavorless, bitter, or sour cup.
It’s also critical to grind just before brewing to retain as much freshness as possible.
Using the right temperature
Finally, you need to have the correct temperature. Boiling water will scald and burn coffee, so that’s why all of the methods above tell you to remove the water from the boil right as you add coffee grounds.
1. Simple Stovetop coffee (no filter or paper towel needed)
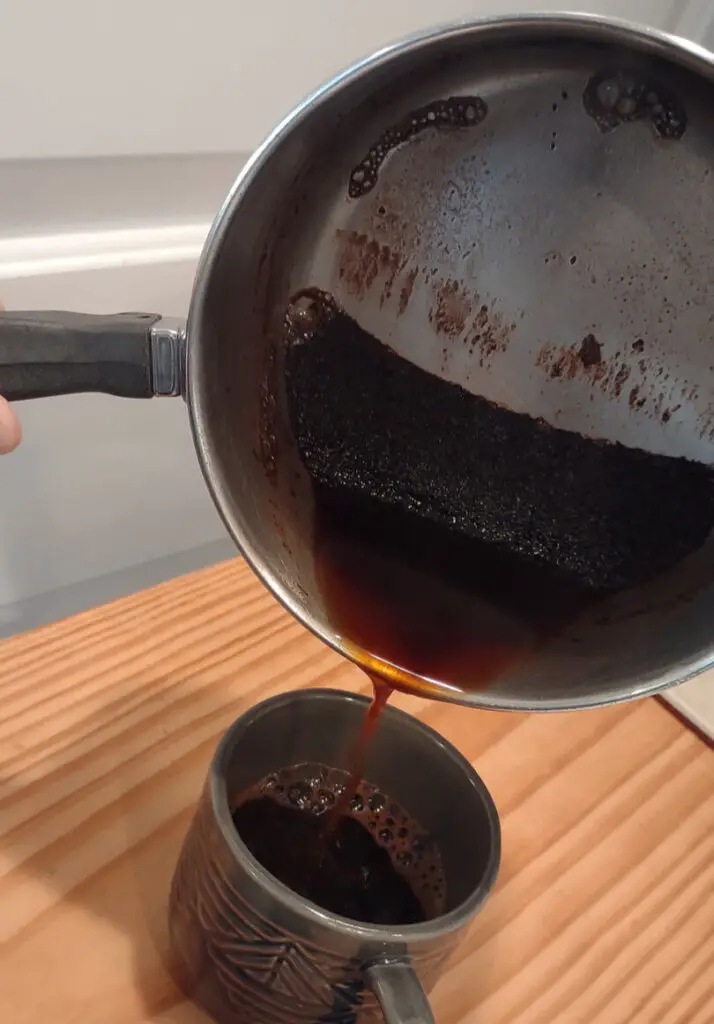
This is the most basic method, and it makes pretty good coffee. You can also use this method while camping, since all you really need to make this coffee is a heat source, a pot or saucepan, and coffee.
Put some water on the stove to boil in a saucepan. The beauty of this method is that you can make as many cups as you need in a single go! Use a little more water than the amount of coffee you’re looking for.
For example, if you wanted a single cup, add 9-1o ounces instead of 8 ounces.
What you’ll need
- A saucepan
- A heat source (fire/range/stove)
- Ground coffee
- A ladle (optional)
- A mug
How to make it
- Put a saucepan on the stove. Add a little more water than the final volume of coffee you’re looking for. To make an 8 ounce cup, add around 9 ounces of water. If you’re camping and you don’t have a measuring cup, just add a bit more water than you’d normally fill your mug to
- Once the water starts boiling, add coffee grounds, kill the heat, and cover the saucepan. Add 2 tablespoons (12-15 grams) of ground coffee for every cup
- In 4 to 5 minutes, the coffee will have brewed and the grounds will have settled to the bottom of the cup
- Use a ladle to pour out your coffee. This will help keep as many grounds out of your drink as possible
- Enjoy!
2. DIY Filter Pour Over Coffee
You’ll require two more pieces of equipment for this method compared to stovetop or cowboy coffee, but this mimics the drip coffee method and you’ll get some really nice tasting coffee, for what it’s worth.
You want to use a kettle, but emergencies may call for using a microwave for heating.
What you’ll need
- A kettle, preferably with a small/long spout
- Coffee grounds (ground to drip coffee consistency)
- A coffee filter or a handkerchief
- A mug
- Something like a binder clip to secure the filter in place
How to do it
- Heat up your water to 195 degrees Fahrenheit, or between 90-95 degrees Celcius. If you’ve boiled your water all the way, leave it out for 30 seconds to a minute and the temperature should drop. If you want to be really finicky, use a thermometer to make sure the temperature is just right.
- Place the coffee filter or handkerchief in the top part of the mug and secure it with binder clips. Add your coffee grounds (same measurement as before, about 2 tablespoons for 6-8 ounces of water). Pro tip: If you’re using a handkerchief, remember to leave some of it hanging outside the mug so it’s easy to secure. Some people advocate folding the handkerchief over into half or a quarter, but that’s totally optional. I encourage you to experiment and see how adding folds changes the flavor of the coffee!
- Now pour the water very slowly and gradually, making sure to wet all the coffee grounds as evenly as possible. This is just your first pour, where you’ll see bubbles form in the water. In coffee-speak, this process is called “blooming“, where the coffee grounds are releasing the stored CO2.
- Add some more water, wait, and finish your water in two more pours. Remember, after all, that this is pour-over coffee.
- Once you’ve emptied all of the water, wait for the water to filter through into your mug. You may find that you have to gently stir the coffee sludge on the filter to get it to filter through.
- Remove the filter, and enjoy your coffee!
3. Strainer Coffee (DIY French press)
This is essentially the same as the stovetop method, except you don’t have to wait for the grounds to settle to the bottom of your pot. You can just give it a couple of minutes to brew and then pour straight away. You need a good strainer on hand, though.
Note: While this method is also similar to DIY pour over coffee, the mesh of the strainer is going to let the water drip through too fast, not leaving enough time to extract enough flavors.
Here’s what you’ll need:
- Coffee grounds (french press to drip consistency)
- Water
- A pot and heat source
- A strainer (the finer the mesh the better)
- A mug
How to do it
- Measure out the amount of water you need for your coffee, and bring it to a boil on the stovetop. Remove from heat.
- Add your coffee (remember the golden ratio: 2 tablespoons, 12-15 grams for 6 to 8 ounces)
- Let it steep for twfouro minutes and pour the liquid through the strainer into your mug. The strainer will catch all the grounds and you’ll be left with a great tasting coffee.
- Enjoy!
4. DIY Coffee Bag
This method is inspired from coffee’s cousin, tea. Teabags are really common, so why not coffee bags? Some companies actually make coffee pouches that you can throw into some hot water, but if you want to use your own beans and grinds, then it’s really easy to make your own coffee bag to dip.
Here’s what you’ll need:
- Hot Water
- Coffee grounds (drip consistency)
- a coffee filter or handkerchief
- string, but make sure not is not coated with wax
- A mug
- Instead of heating the water first, this time, we’ll make the coffee pouch. The only drawback of this method is that the pouch is not reusable, and you’ll have to throw out the filter, and it’s better than to substitute a hanky here (though you could try).
- Add your two tablespoons of coffee into your coffee filter, then pinch the filter closed from above the coffee level.
- Twist it a couple of times to secure it, and finally, tie some string around it to really hold it in place. Leave a length of string hanging as you’ll need this to dip and remove the pouch.
- You can also use a spoon if you don’t have long enough string.
- Heat up some water to 195 degrees F (90-95 C) and pour it into the mug. Drop in the coffee pouch, and let it brew for 3-4 minutes. You can play with the time a little bit to adjust the strength of the brew as you like it.
- Once the time has elapsed, pull out the pouch with the string or fish it out with the spoon, and you’re good to go!
- Enjoy!
5. Microwave Coffee
This is the quick and dirty version of stovetop coffee.
What you’ll need
- a microwave
- coffee grounds
- two mugs
- A spoon
- strainer or filter (optional)
- thermometer (optional)
How to do it
- Put some water to heat up in the microwave, about 2 minutes. At this point, it will be piping hot but just short of boiling. This should save you about 4-5 minutes compared to getting the water to a boil on the stove. Use a thermometer to measure the temperature if you want to be exact
- Stir in two tablespoons (12-15 grams) of ground coffee and give it 3-4 minutes to settle to the bottom of your mug.
- There will be some foam left at the top which you can scoop off with a spoon
- At this point, you can either drink it right away or you can decant the coffee into a second mug with or without a strainer. To get really clear coffee that you can drink every last drop of, use a strainer.
6. Cold brew coffee
Cold brew coffee takes much longer to make than the rest of these methods, but you’ll usually make quite a lot of coffee which you can refrigerate and enjoy over the course of a few days.
What you’ll need
- Coarsely ground coffee
- A mason jar or large bottle
- A handkerchief
- Room temperature or cold water
How to do it
- You’ll be making a lot of coffee here. The ratio I prefer to use is 1:8, in which case you’ll need 125 grams of coffee grounds for every liter of water. Make at least a liter so you have multiple servings.
- Pour 1 liter of water into a mason jar or bottle
- Wrap the coffee grounds in a handkerchief, tie it securely, and drop it in. If you don’t have a handkerchief, just drop in the grounds directly and gently stir to wet them evenly
- Close the bottle/mason jar and let it rest on your counter or in the fridge for 12-18 hours
- Pull out the handkerchief. If you added the grounds directly, just decant the coffee over a strainer to catch any loose grounds
- Enjoy straight, over ice, or with a splash of milk!
7. Indian Cappuccino/Dalgona Coffee
So this method isn’t quite an authentic latte or cappuccino since both those beverages need espresso shots, and we’re working without a machine here, but it will give you similar mouth feel thanks to the foamy texture we’ll make. During the Coronavirus pandemic, this drink has exploded in popularity on social media.
For this method to work you’ll need *sigh* instant coffee, so if you have a favorite brand, I’d suggest you use it. You can also use Sudden Coffee, which is the closest thing instant coffee will get to gourmet coffee.
What you’ll need:
- Instant coffee granules
- Water
- Two mugs
- A spoon or handheld milk frother
- Sugar to taste
- Milk
How to do it
- Add one teaspoon of coffee grounds to a mug, and add just a few drops of hot water in. You need to make a paste, so make sure you have added very little water. This will not work if the mixture is too liquidy. Add sugar to taste – and if you add some sugar, you’ll need a few more drops of water.
- Using a spoon or frother, start stirring the coffee/water mixture very vigorously. In a couple of minutes, you’ll see the mixture become much lighter in color and it will acquire the consistency of a paste. If you whip it even further, it will become foamy almost like whipped egg whites
- To this, add some hot or cold milk. A layer of foam will form on the top and you’ll have a nice, milky coffee. For an extra frothy beverage, add frothed hot milk instead of just hot milk.
- You can also just pour milk and add dollops of the whipped coffee to the top. Gently mix so the dollop remains intact but the bottom of the foam mixes into the milk
Conclusion: can you make coffee without a coffee maker?
While you may not be able to make a 100% replacement for your favorite machine coffee without the actual machine, these ways to make coffee without a coffee maker will help you brew a decent cup that will satisfy your caffeine craving!
We’re not suggesting you go off-grid and only stick to these methods, but it’s nice to know that you can still brew good coffee on the road, while camping, or just stuck at home waiting for your coffee machine to reach.
So to sum up, you can make coffee without a coffee maker, but whether you should always make coffee without a coffee maker is not too advisable!
Frequently asked questions
What about good quality instant coffee?
If all else fails, you can consider drinking instant coffee.
The plus side of instant coffee is that it’s made from mostly robusta beans, so it has a lot more caffeine. There are lots of artisan instant coffees now available which aren’t quite as bad as the really cheap supermarket stuff. If you want something really top of the line, consider Sudden Coffee, which I mentioned in the Indian Cappuccino method.
Can you just eat coffee beans instead?
Sure! In fact, many people enjoy eating coffee beans. Some people like to munch on plain coffee beans, and others enjoy chocolate covered coffee beans, too.
Do you need electricity to make coffee?
Not really! If you have a gas stove, that’s all you need to get the water hot enough. You can also make cold brew coffee, for which you can use room temperature water.